
The internet has revolutionized many aspects of our lives, and birdwatching is no exception. Gone are the days of relying solely on word-of-mouth or outdated field guides to find your feathered friends. Today, a powerful tool exists that connects birders worldwide and provides an unparalleled wealth of information: eBird.
Developed by the Cornell Lab of Ornithology, eBird is a free, web-based platform that allows birders to record their sightings, explore data from others, and contribute to a massive global dataset used by scientists and conservationists. But beyond its scientific value, eBird is an incredible resource for finding birds, discovering new birding locations, and diving deep into species-specific information. This comprehensive guide will provide you with over 1000 words of tips and strategies for maximizing your eBird experience, complete with illustrative graphics to help you along the way.

Getting Started: The Essentials of eBird
Before you can truly harness eBird's power, you need to understand its core functionalities.
- Create an Account: The first step is to create a free account on the eBird website (www.ebird.org). This will allow you to submit your own sightings and personalize your eBird experience.
- Understand Checklists: The heart of eBird is the "checklist." A checklist is a record of all the bird species you observed at a specific location, on a specific date, and for a specific duration. You can submit checklists through the website or, more conveniently, through the eBird mobile app (available for iOS and Android).
- Explore the Website: Familiarize yourself with the various sections of the eBird website. Key areas include "Explore," "Submit," "My eBird," and "Science." We'll be focusing heavily on the "Explore" section for finding birds and locations.
Finding Birds: Leveraging eBird's Data
eBird's true magic lies in its vast database of millions of bird observations. Here's how to tap into that data to find the birds you're looking for.
Tip 1: Use "Explore Hotspots" to Discover Birding Locations
One of the most straightforward ways to find birds is to visit known "hotspots." These are locations where many birders regularly report sightings, indicating a high likelihood of avian activity.
- Navigate to Explore Hotspots: From the eBird homepage, click on "Explore" in the top navigation bar, then select "Explore Hotspots" from the dropdown menu.
- Search by Region: You'll be presented with a map. You can zoom in on your desired region (state, county, or even specific town).
- Identify Hotspots: Hotspots are marked by red pins. The number next to the pin indicates the total number of species recorded at that location. Larger numbers generally mean more diverse birding opportunities.
- View Hotspot Details: Click on a red pin to view details about that hotspot. This will often include a list of species recently observed, a bar chart of all species ever recorded, and sometimes even directions or a brief description of the site.
Let's say you're in California and want to find good birding spots in Monterey County. You would navigate to California, then zoom in on Monterey County, and the map would reveal numerous hotspots.
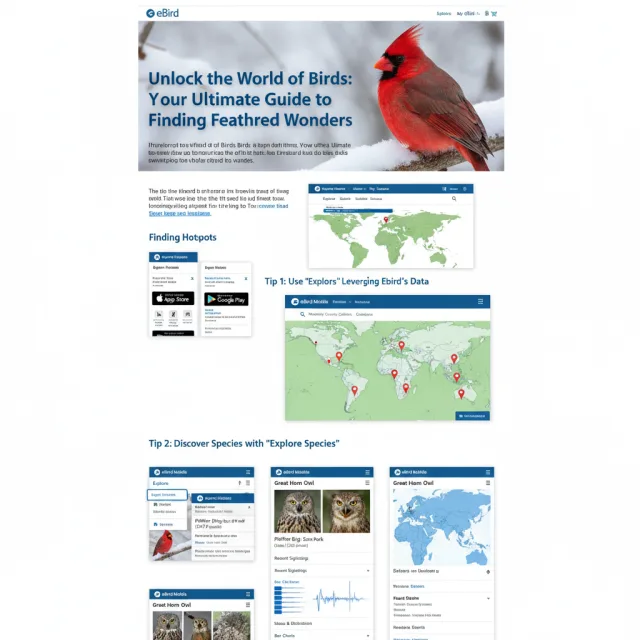
Tip 2: Discover Species with "Explore Species"
If you have a particular species in mind that you want to find, "Explore Species" is your go-to tool.
- Navigate to Explore Species: From the "Explore" menu, select "Explore Species."
- Search for Your Target: Type the name of the bird you're looking for (e.g., "Great Horned Owl") into the search bar.
- Species Profile Page: You'll be taken to a species profile page, which is a treasure trove of information.
- Photos and Sounds: High-quality photos and audio recordings of the bird.
- Bar Charts: A visual representation of the species' occurrence throughout the year in different regions. This is crucial for understanding seasonality.
- Species Maps: A global distribution map showing where the bird has been reported. This is where you'll find recent sightings.
- Recent Sightings: Scroll down on the species profile page, and you'll find a list of recent sightings, often with links to the specific checklists. This is invaluable for pinpointing where and when the bird was last seen. You can filter these sightings by region to narrow down your search.
For instance, if you're looking for a Great Horned Owl, you can check its species map and recent sightings to see where others have reported it in your area. You can also view the bar charts to see the best time of year to look for them.
Tip 3: Utilize "Rare Bird Alerts" for Exciting Discoveries
For those who enjoy chasing unusual or out-of-range birds, eBird's "Rare Bird Alerts" are indispensable.
- Set Up Alerts: You can configure eBird to send you email notifications when rare or unusual birds are reported in your chosen region.
- How to Access: Go to "My eBird," then "Alerts." You can set up alerts for specific species, regions, or even "needs alerts" for species you haven't yet added to your life list.
- Act Quickly: When a rare bird is reported, it often doesn't stick around for long. If you receive an alert for a bird you want to see, it's best to act quickly. Check the associated checklist for details like exact location and time of observation.
Tip 4: "Explore a Region" for Comprehensive Local Birding
If you want a broader overview of bird activity in a specific area, "Explore a Region" is your friend.
- Navigate to Explore a Region: From the "Explore" menu, select "Explore a Region."
- Select Your Area: Choose a country, state, or county.
- Regional Overview: This page provides a wealth of information:
- Top Birders: See who's submitting the most checklists in the area.
- Recent Checklists: A feed of all recently submitted checklists, allowing you to see what's being reported.
- Species Recorded: A complete list of all species ever recorded in that region.
- Hotspots and Locations: Direct links to hotspots and other birding locations within the region.
- Bar Charts for the Region: These bar charts are incredibly useful as they show the seasonal occurrence of all species in that specific region. This helps you understand when certain migratory birds are present.
By exploring a region, you can quickly grasp the overall birding landscape and identify peak times for different species.
Understanding Species Information: Beyond Just Finding Them
eBird isn't just about finding birds; it's also a powerful tool for learning about them.

Tip 5: Interpret Bar Charts for Seasonal Presence
Bar charts are one of eBird's most valuable features for understanding species distribution over time.
- Reading the Bars: The thickness and color intensity of the bars represent the likelihood and abundance of a species during different weeks or months of the year. Thicker, darker bars indicate a higher chance of seeing that bird.
- Migratory Patterns: Bar charts clearly show migratory patterns, with peaks during spring and fall migration and troughs during winter or summer for species that aren't year-round residents.
- Breeding and Non-breeding Seasons: You can infer breeding seasons by looking for periods of consistent high abundance, especially for resident species.
For example, a bar chart for an American Robin in a northern state would show strong presence throughout the spring, summer, and fall, with a noticeable dip in winter when many move south.
Tip 6: Utilize "Similar Species" and Identification Resources
While eBird itself isn't a field guide for identification, the species profile pages often link to valuable resources.
- Similar Species: The "Similar Species" section (often found on a species profile page) can help you differentiate between closely related birds.
- External Links: eBird species pages frequently include links to the Cornell Lab of Ornithology's All About Birds website, which offers comprehensive identification guides, vocalizations, and life history information. Think of eBird as the "where and when," and All About Birds as the "what and how."
Tip 7: Delve into "Observation Details" for Context
When you click on a recent sighting or a specific checklist, you can often see "Observation Details."
- Comments from Observers: Birders often leave comments about their observations, such as "seen foraging in the oak trees," "heard calling from the dense undergrowth," or "photographed near the pond." These comments can provide crucial context and tips for finding the bird yourself.
- Media Attached: Sometimes, observers attach photos or audio recordings to their checklists, which can aid in identification or simply provide a visual of the bird.
Planning Your Birding Trips: Putting it All Together
Now that you know how to navigate eBird's various features, let's look at how to synthesize this information for successful birding trips.
Tip 8: Combine Hotspot Exploration with Species-Specific Searches
Don't just rely on one method. For a targeted search:
- Identify Target Species: Decide which bird(s) you want to find.
- Check Species Maps and Bar Charts: Determine the best time of year and general distribution for your target.
- Explore Hotspots in Relevant Regions: Look for hotspots within the bird's typical range and during its active season.
- Review Recent Sightings: On the species page, filter recent sightings to the chosen region and timeframe. This will often point you directly to a specific hotspot or even a less-known location where the bird has been seen recently.
- Check Hotspot Details: Once you've identified a promising hotspot, view its details to see if your target species is regularly reported there.
Tip 9: Use eBird Mobile App for Real-Time Information in the Field
The eBird mobile app is an indispensable tool once you're out birding.
- Submit Checklists On-the-Go: Easily record your sightings as you go.
- Find Nearby Hotspots: The app uses your location to show you nearby hotspots and recent sightings.
- Access Species Info: Quickly pull up species profiles, photos, and sounds for identification help in the field.
- Review Recent Sightings: While in the field, you can quickly check recent sightings for your target species in the immediate area.
Tip 10: Contribute Your Own Data – The Cycle of Information
Remember, eBird's power comes from its community. By submitting your own checklists, you're contributing to the very database that you rely on to find birds.
- Submit Complete Checklists: Even if you only see a few common birds, submit a complete checklist. Every data point is valuable.
- Be Accurate: Ensure your identifications are accurate, your location is precise, and your date and time are correct.
- Add Comments and Details: If you see something interesting or have specific information that could help others, add it to your checklist comments.
Wrapping Up
eBird is more than just a place to log your bird sightings; it's a dynamic, ever-growing platform that empowers birders of all levels to connect with the avian world. By mastering its "Explore" functions – from hotspots and species maps to bar charts and rare bird alerts – you can dramatically increase your success in finding birds, discovering new birding locations, and deepening your understanding of avian ecology. Remember to contribute your own observations, and you'll be part of a global community that's advancing both birding and conservation efforts. Happy birding!
